A Step-by-Step Guide to Refreshing Your Kitchen

How to Refurbish Kitchen Cabinets: A Step-by-Step Guide to Refreshing Your Kitchen

Refurbishing kitchen cabinets can be one of the most impactful and cost-effective ways to refresh the look and feel of your kitchen. Kitchen cabinets are one of the most prominent elements in your cooking space, and over time, they can show signs of wear and tear. By refurbishing rather than replacing them, you can give your kitchen a fresh new look without the high cost or time commitment of a complete renovation. In this post, we'll walk you through how to refurbish your kitchen cabinets with a detailed step-by-step guide that will help you achieve professional-looking results.

Why Refurbish Your Kitchen Cabinets?

Before diving into the process, it’s essential to understand the benefits of refurbishing cabinets:

  • Cost-effective: Refurbishing cabinets can cost a fraction of what replacing them would.
  • Sustainability: By keeping your existing cabinetry, you reduce waste and limit the demand for new materials, making it an eco-friendly choice.
  • Customization: Refurbishing allows you to update your kitchen’s look in a way that aligns with your personal taste, whether through painting, staining, or adding new hardware.

Now, let's get into the process!


Tools and Materials Needed

Before you start the project, gather the necessary tools and materials:

  • Screwdriver
  • Drop cloths or painter’s tape
  • Sandpaper (120-grit and 220-grit)
  • Wood filler
  • Putty knife
  • Painter’s tape
  • Paintbrushes or rollers
  • Paint or wood stain
  • Primer
  • Polyurethane (for protection)
  • New hardware (optional)
  • Cleaning supplies (mild detergent, water, and a sponge)
  • Cabinet cleaner or degreaser
  • Wood conditioner (if staining)

Step 1: Plan and Prepare

Proper planning and preparation are key to a successful refurbishing project. Consider the following:

  1. Assess Your Cabinets: Inspect the overall condition of your cabinets. Are they in good structural shape? If so, refurbishing is a great option. If they’re damaged or warped, you may need to consider replacements.

  2. Choose Your Look: Decide whether you want to repaint, restain, or refinish your cabinets. For a modern and sleek look, painting might be the best choice. If you prefer a more natural or traditional look, staining can bring out the beauty of the wood grain.

  3. Clear Out Your Space: Remove all items from your cabinets and cover countertops, appliances, and floors with drop cloths to protect them from paint or dust.


Step 2: Remove Doors, Drawers, and Hardware

Before you can start sanding or painting, you’ll need to disassemble your cabinets. Here’s how:

  1. Remove Cabinet Doors and Drawers: Use a screwdriver to remove the cabinet doors from their hinges. Be sure to label each door and drawer so you can easily reassemble them later.

  2. Take Off the Hardware: Remove the handles, knobs, and hinges from the doors and drawers. If you're planning to replace the hardware, you can discard the old pieces. If not, place them in labeled bags for easy reattachment.

  3. Prepare Hinges for Reuse (if needed): If you plan to reuse your hinges, soak them in warm, soapy water and scrub away any dirt or grime. Allow them to dry thoroughly before reinstalling.


Step 3: Clean and Degrease

Kitchen cabinets are prone to collecting grease, grime, and dust over time. Before you begin sanding or painting, it’s essential to clean them thoroughly.

  1. Use a Cabinet Cleaner: A mild detergent or a specialized cabinet cleaner/degreaser will help remove the buildup. Scrub all surfaces (doors, drawers, and cabinet frames) with a sponge and rinse them with clean water. Pay extra attention to areas around handles and corners where dirt tends to accumulate.

  2. Let Dry Completely: Allow the cabinets to air dry for several hours or overnight before moving on to the next step.


Step 4: Sand the Cabinets

Sanding is a crucial step for ensuring that the new paint or stain adheres well to the surface of your cabinets.

  1. Sand the Surfaces: Use 120-grit sandpaper to sand the cabinet doors, drawers, and frames. This roughs up the surface and helps remove any old paint or finish that may still be clinging to the wood.

  2. Repair Any Damage: If you notice any holes, dents, or scratches, now is the time to repair them. Use a wood filler and putty knife to fill in these imperfections, then allow it to dry.

  3. Smooth Sanding: After repairing any damage, switch to finer 220-grit sandpaper to smooth the surface further. Be sure to sand along the grain of the wood.

  4. Clean Again: After sanding, clean the cabinets with a damp cloth or vacuum to remove any dust. Make sure the surfaces are dust-free before applying paint or stain.


Step 5: Prime the Cabinets (for Painting)

If you’re painting your cabinets, priming them first is essential to ensure the paint adheres well and provides long-lasting results.

  1. Apply Primer: Use a brush or roller to apply a coat of primer to the doors, drawers, and cabinet frames. Be sure to cover all areas, including corners and edges.

  2. Let Dry: Allow the primer to dry according to the manufacturer’s instructions. This usually takes a few hours.

  3. Sand Again: Once the primer is dry, lightly sand the surface with 220-grit sandpaper to smooth out any rough spots. Wipe down the cabinets with a clean cloth to remove dust before painting.


Step 6: Paint or Stain

Now comes the exciting part—adding color or stain to your cabinets!

For Painting:

  1. Choose High-Quality Paint: Select a high-quality paint that’s suitable for cabinetry. Semi-gloss or satin finishes work well, as they provide durability and are easy to clean.

  2. Apply Thin Coats: Use a paintbrush for detailed areas and a roller for large, flat surfaces. Apply thin, even coats of paint to prevent drips or uneven coverage. It’s better to apply multiple thin coats than one thick coat.

  3. Allow Ample Drying Time: Let each coat dry completely before applying the next coat. Most cabinets will require two to three coats for full coverage.

For Staining:

  1. Condition the Wood: If you’re staining, apply a wood conditioner first to help the stain absorb evenly into the wood.

  2. Apply Stain: Use a clean, lint-free cloth or brush to apply the stain in the direction of the wood grain. Wipe off excess stain with a cloth, and allow the stain to dry according to the manufacturer’s instructions.

  3. Multiple Coats (Optional): For a darker finish, apply additional coats of stain, allowing each coat to dry thoroughly before applying the next.


Step 7: Seal and Protect

Whether you painted or stained your cabinets, sealing them with a protective finish is essential to ensure durability.

  1. Use Polyurethane: Apply a water-based polyurethane (for lighter finishes) or oil-based polyurethane (for darker finishes) to protect your cabinets from moisture, stains, and daily wear and tear.

  2. Apply Thin Coats: As with paint, it’s best to apply multiple thin coats of polyurethane. Use a clean brush or foam applicator, and sand lightly between coats with 220-grit sandpaper for a smooth finish.

  3. Let Dry Completely: Allow the polyurethane to cure fully before reassembling your cabinets. This may take up to 24 hours, depending on the product used.


Step 8: Reassemble and Install Hardware

Once your cabinets are dry and ready, it’s time to reassemble everything.

  1. Reattach Doors and Drawers: Using your labeled doors and drawers, reattach them to their corresponding cabinets using the cleaned or new hinges.

  2. Install New Hardware (Optional): If you’ve decided to update the look of your cabinets with new knobs or pulls, now is the time to install them. Be sure to measure and mark where the new hardware will go before drilling any holes.


Step 9: Enjoy Your New Kitchen!

After the hard work is done, step back and admire your refreshed kitchen. Refurbished cabinets can completely transform the look of your space, making it feel modern, clean, and updated. Whether you opted for a bold color, a fresh coat of white paint, or a rich wood stain, your kitchen will feel like new without the hefty price tag of a full renovation.


Final Tips for Cabinet Refurbishment

  • Take Your Time: Refurbishing cabinets is a labor-intensive project, but rushing through any steps—especially sanding or applying finishes—can result in less-than-perfect results.
  • Ventilation: Ensure your kitchen is well-ventilated during painting or staining to avoid inhaling fumes.
  • Test on a Small Area: If you’re unsure about a paint or stain color, test it on a small, inconspicuous area of a cabinet first.
  • Use Quality Materials: Quality paint, stain, and tools can make a huge difference in the final result and the longevity of your refurbished cabinets.

By following these steps, you'll be well on your way to giving your kitchen cabinets a fresh, new look. Whether you’re refreshing old cabinets to modernize your kitchen or simply giving your favorite space a facelift, refurbishing cabinets is a fulfilling DIY project that offers lasting results.

Refurbishing kitchen cabinets can be one of the most impactful and cost-effective ways to refresh the look and feel of your kitchen. Kitchen cabinets are one of the most prominent elements in your cooking space, and over time, they can show signs of wear and tear.

Photo by JOSBRA design on Unsplash

Kitchen Faucet Buyers Guide

When it comes to buying a kitchen faucet, narrow the "spraying field" by identifying the style you want, the function you need and the budget you have.

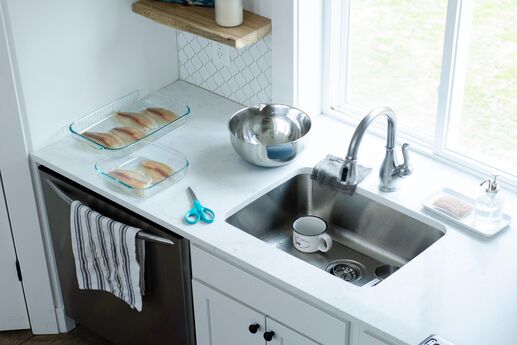
The kitchen faucet is one of the most hardworking fixtures in your house. It’s the central hand-washing station and dish-rinsing hub, and the occasional makeshift bath for baby. With a flick of the wrist or a gentle touch, it enables food preparation, cleanliness or a drink of water in your home’s busiest multipurpose room. “The faucet has become the ultimate accessory in the kitchen arena,” says Tracy Morris, an interior designer based in Washington, D.C., who has a modern flair with classic design. Faucet style isn’t as fickle as fashion, yet industrial designers keep dressing up this kitchen basic with innovative lifestyle-enhancing technology. Built to serve and designed to appeal, the average-quality faucet lasts about 10 years.

Here are some practical guidelines for choosing a kitchen faucet:

STYLE
“We’re still drawn by the eyes, and at the end of the day the aesthetics have to work for us,” says Paul Anater, kitchen designer and editor of Kitchen and Residential Design. When it comes to the look of a faucet, focus on configuration, shape and finish.

  • Configuration relates to the number of holes -- typically one to four along the sink or wall -- that accommodate the faucet’s parts. A one-hole configuration offers an uncluttered, clean look and suits a faucet with an attached lever. Conversely, a bridge-style faucet with a side spray requires three or four holes. If you are replacing a faucet rather than beginning new construction, avoid the need for more holes by choosing a faucet that has the same configuration or fewer holes than your old model. An escutcheon neatly masks any holes that are no longer needed.
  • Shape defines a faucet’s silhouette. Some shapes make a grand statement; others remain relatively anonymous. In general, square and angular faucets with sleek proportions compliment contemporary kitchens, and curved models with heartier spouts and Victorian/nostalgic styling go with traditional. Goosenecks and low-arc faucets are compatible with most design schemes.
  • Finish, here, refers to the color of the faucet. “The faucet finish does not have to match with the cabinet hardware,” says Morris. She often mixes brushed nickel with chrome or rubbed bronze, but will not mix brass and chrome. When in doubt, a safe and stylish suggestion is to stay within the same metallic family.

FUNCTIONALITY
Product designers tweak faucet features and invent technologies that make kitchen sink tasks more user-friendly and less stressful. When comparing how a faucet works, look at how water turns on and off and how maneuverable the spout is.

  • On/Off: Touch faucets activate the stream of water with a simple nudge from the back of the hand, forearm, elbow, or whatever body part isn’t covered in a greasy mess. This is a life-altering feature that benefits neat freaks, parents of sticky-fingered children, and seniors or people with disabilities who may not have the hand control or strength to operate an ordinary handle. While touch is out of reach for some budgets, classic levers and handled faucets are at every price range and require one or two hands to operate.
  • Spouts: The shape and size of a kitchen faucet’s spout contribute to its capability. A spout should fit proportionately with the sink so it reaches more areas of the basin when it swivels. Also, a spout with a high arc allows tall pots or vases to be filled easily.
  • Pull-downs: Pull-down faucets increase flexibility at the sink by enabling the user to pull down the nozzle, extend the reach of the water and direct its flow. The pull-down sprayer often features a toggle to control water flow. Maribeth Kwasniewski, Moen’s senior product designer for kitchens, says pull-downs are the largest-growing segment of the market. Try out some of the mechanisms for pulling down and putting back. A magnetic docking mechanism helps assure the faucet is returned to its original position securely.

DURABILITY
Says Dave Braden, operations manager at Joe Hillman Plumbers of South Florida: “Most faucets we repair are the cheaper off-brand models. So stick with popular names and don’t be afraid to spend.” He also says that it is much easier to get replacement parts from American faucet companies. Faucets are also under limited warranty.

  • Ceramic disc valves typically ward against leaks for a decade. Considering the amount of use and abuse, quality faucets equipped with industry standard ceramic disc valves require little maintenance. Delta’s proprietary diamond dust valves never have to be lubricated and are designed to last about 30 years. Faucet-makers also offer limited lifetime warranties on many faucets.
  • Protective finishes -- such as polyvinyl butyral (PVB), a strong, flexible resin -- built into the colorful coat prevent corrosion, tarnish and scratches and keep your faucet looking good. Specialty finishes like Moen’s Spot Resist are devised to keep stainless and brushed nickel faucets free of fingerprints and water spots.

CONSERVATION AND ENERGY EFFICIENCY
If conserving water and saving energy and money interest you, look for faucets that operate at a 1.5 gallon per minute (GPM) flow. Right now, many faucets operate at 2.0 to 2.2 GPM. Seek out a model with a lower GPM and positive performance reviews.